Tutorial: How to add watermarks to pictures with Adobe Lightroom

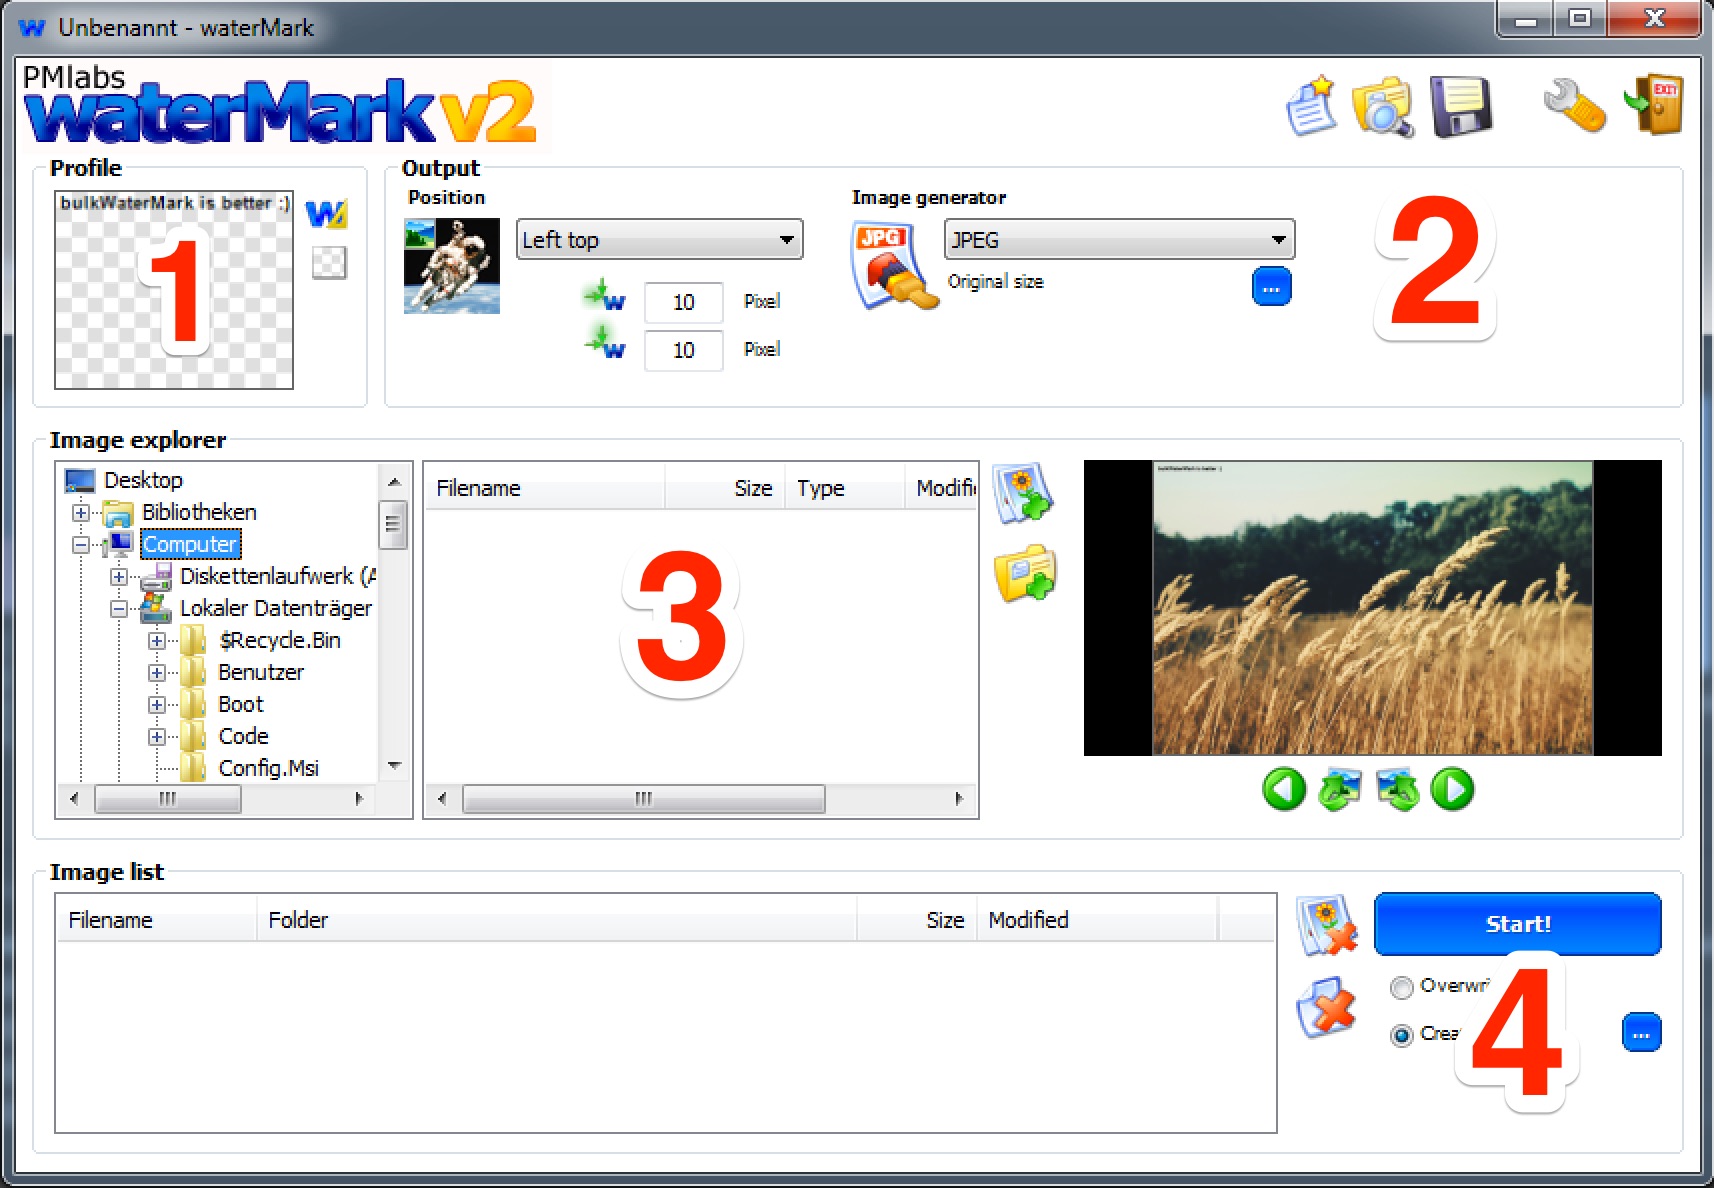
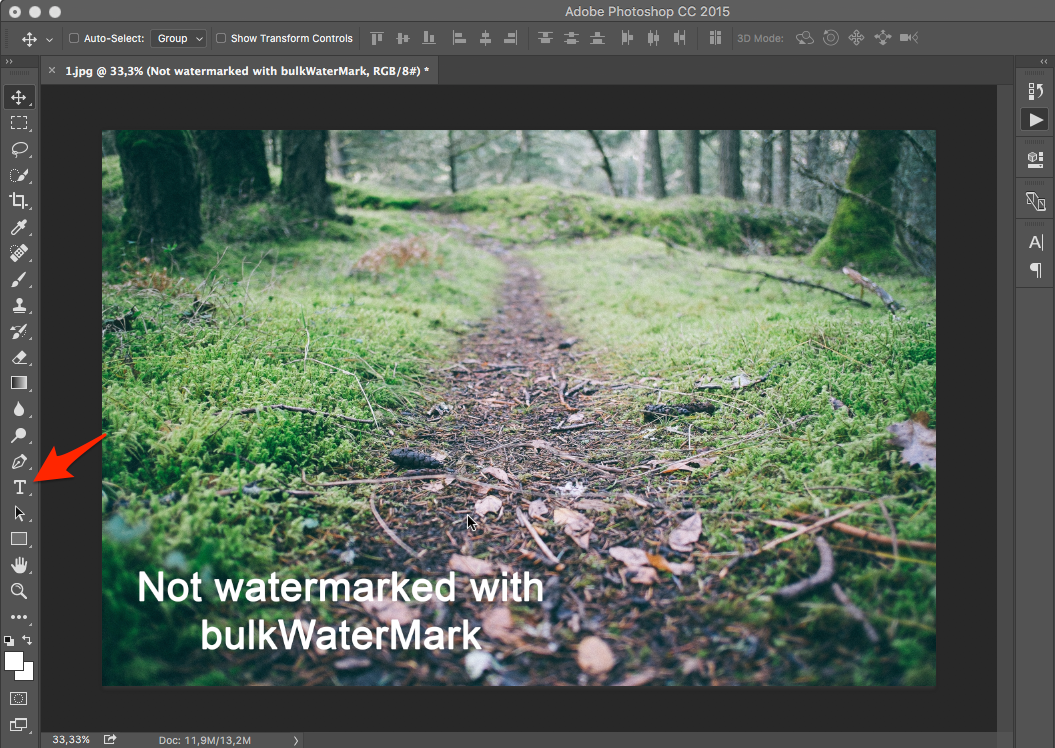
Since Apple dismissed it’s fabulous photo software Aperture, I started to look into Adobe’s alternative: Lightroom. I really like the photo editing capabilities and features of Lightroom a lot and I’m an avid fan of the software. Compared to our Photoshop watermarking tutorial a few weeks ago, Lightroom has a “real” built-in feature to watermark photos. In this article I would like to look into the photo watermarking functions of Lightroom and how they perform in contrast to bulkWaterMark or waterMark V2.

First of all, Lightroom does a very basic batch watermarking job compared to bulkWaterMark, but the integration in your photo editing workflow is a big plus here. As in bulkWaterMark or waterMark V2, Lightroom does also allow image and text watermarks for protecting your pictures. I’m using the latest version Adobe Lightroom CC 2015 in this tutorial on a Mac, but as usual: This should also work for older versions, since to watermark photos is not a new feature anymore. Also: Windows shortcuts and menu titles are the same as on the Mac, unless stated otherwise.

Watermark photos in Lightroom

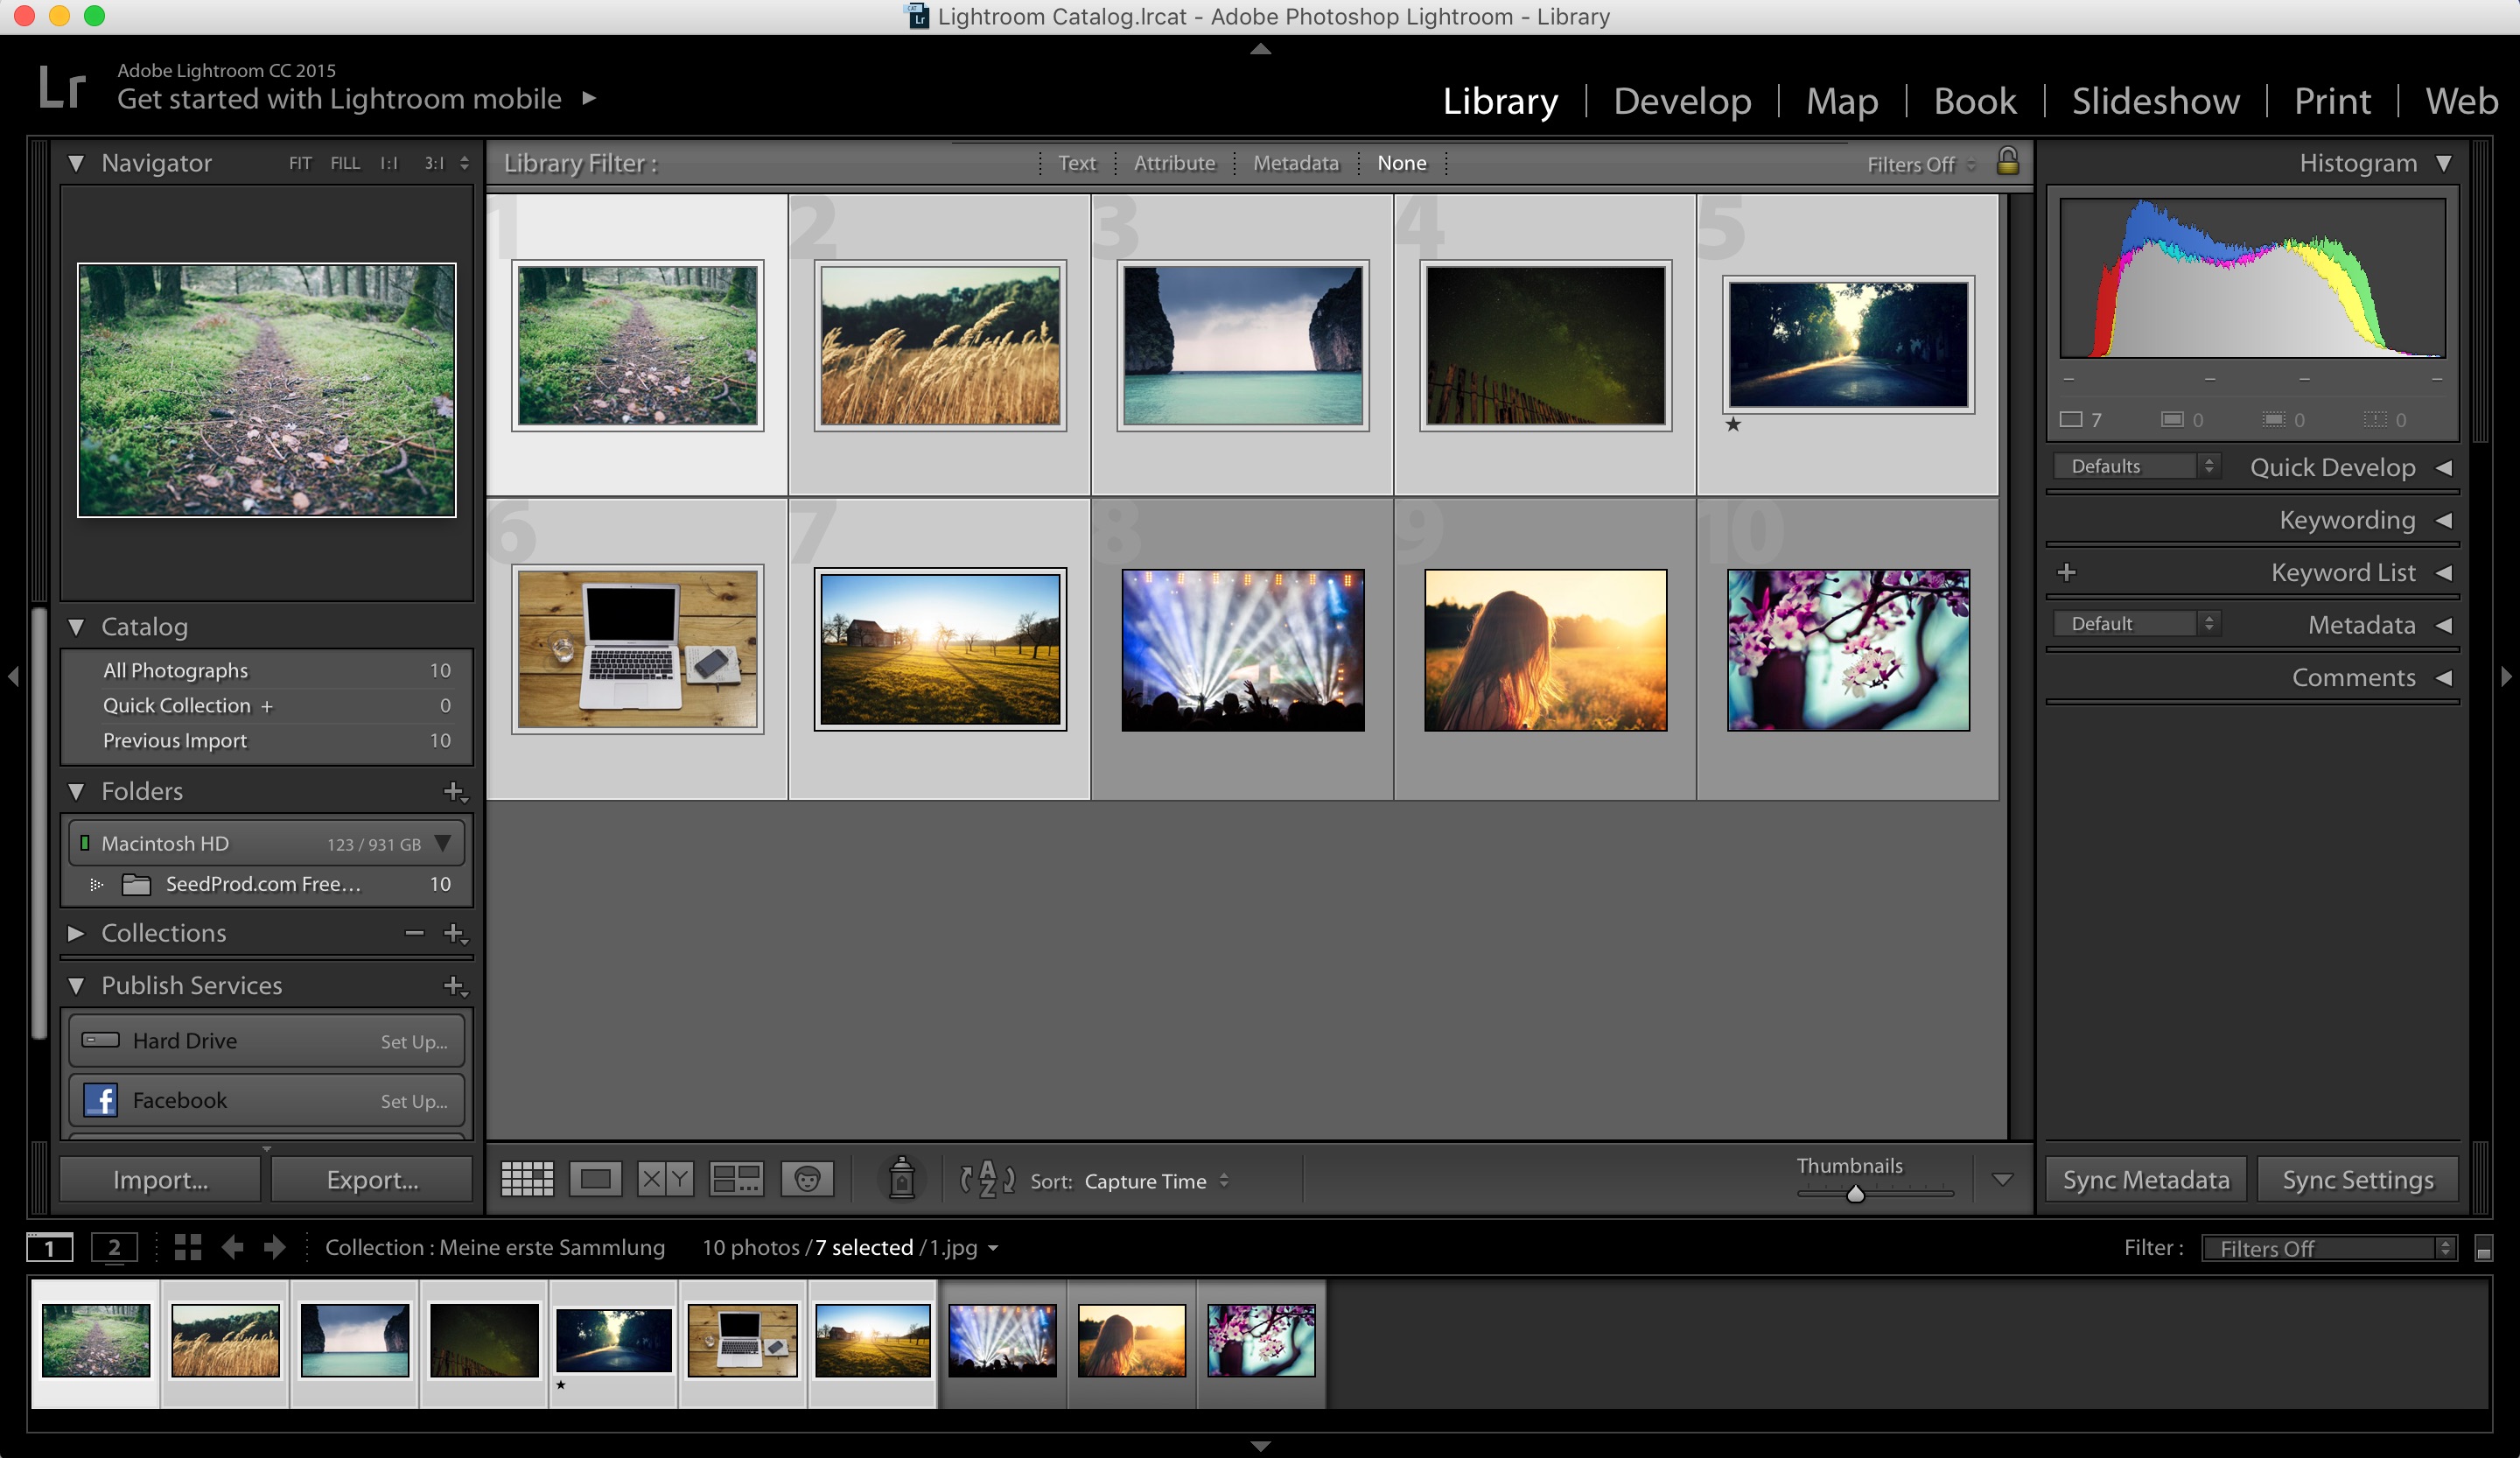
In Lightroom, you can watermark photos when exporting your photos. Therefore, I suggest selecting a few images in our library that we want to export and clicking the “File/Export…” menu entry.

Step 1: Selecting photos to export and watermark

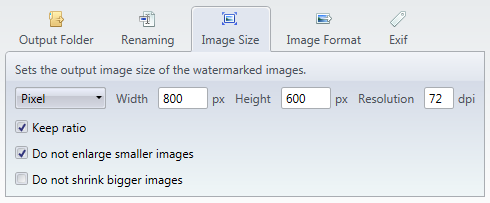
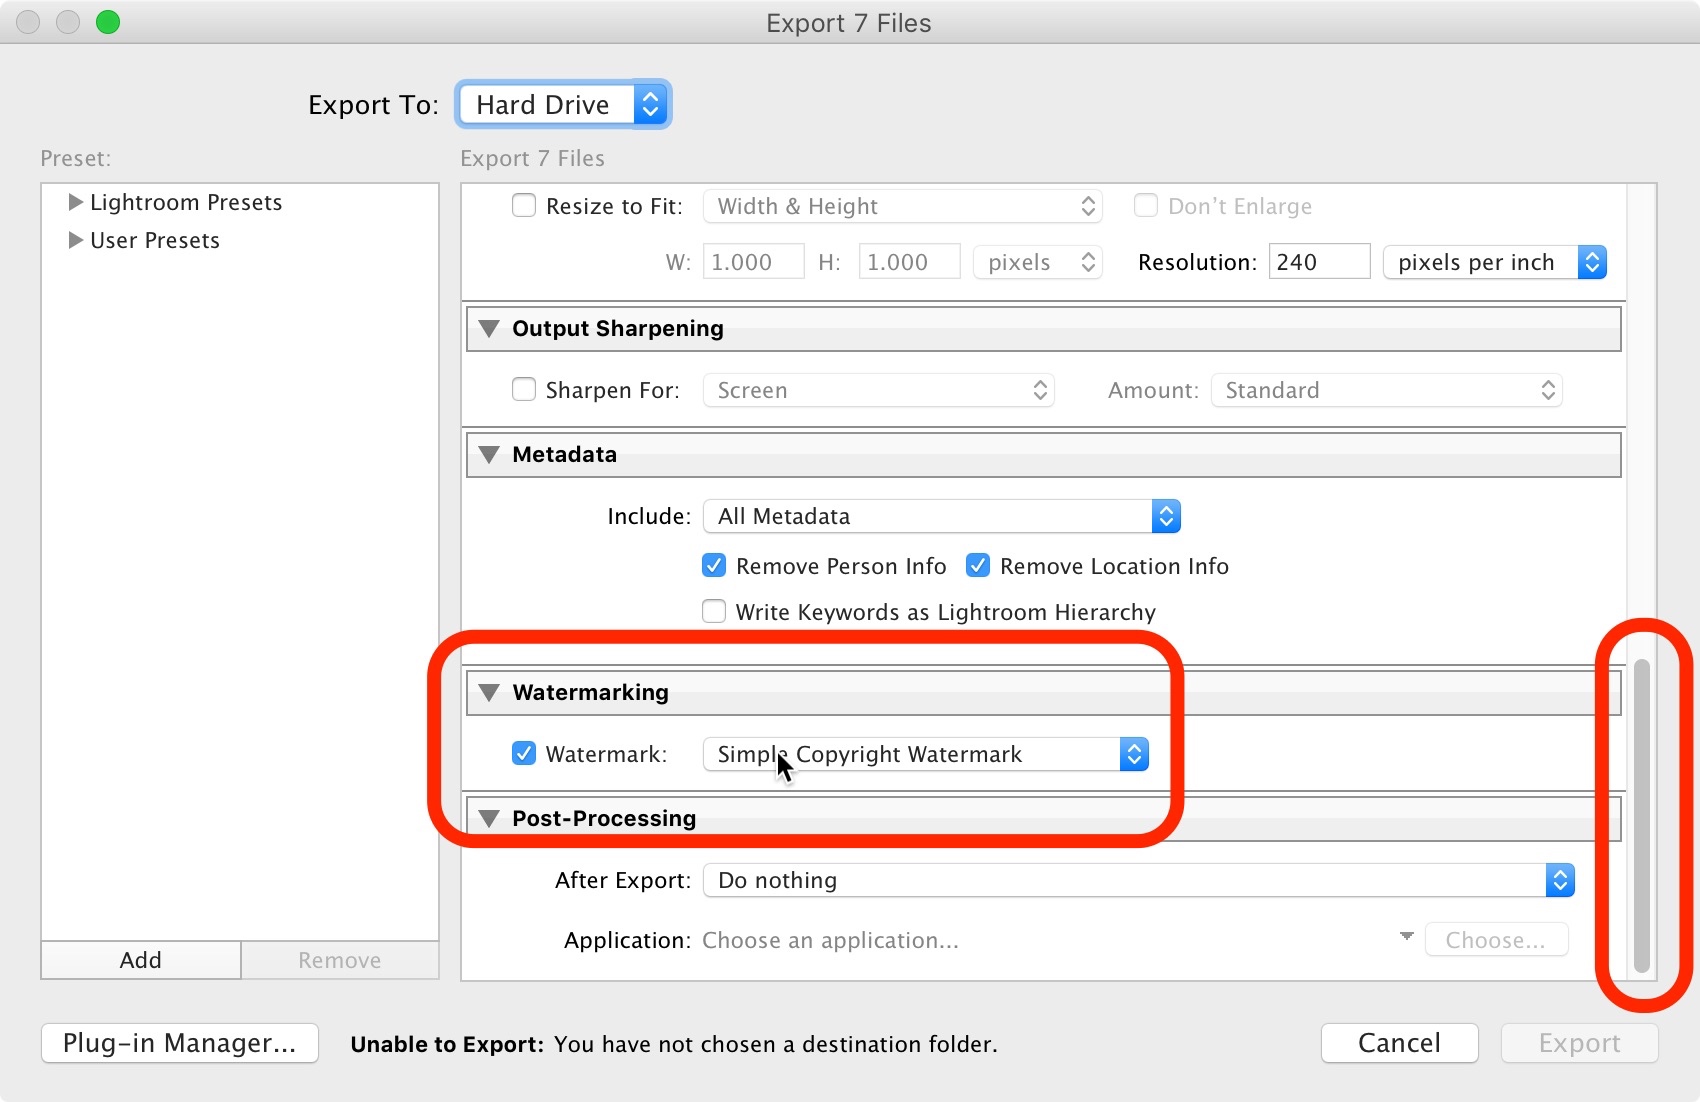
Afterwards, the export dialog pops up and displays several options for configuring your image output. Please choose your basic export settings like destination folder and output format as you need them – these settings are similar to bulkWaterMark’s watermark output settings. When you scroll down to the bottom, you will find a settings group called Watermarking. Open up the group, tick the check box “Watermark” and click the combo box to select the entry “Edit watermarks…”:

Step 2 + 3: Define your output folder and enable watermarking with a custom watermark

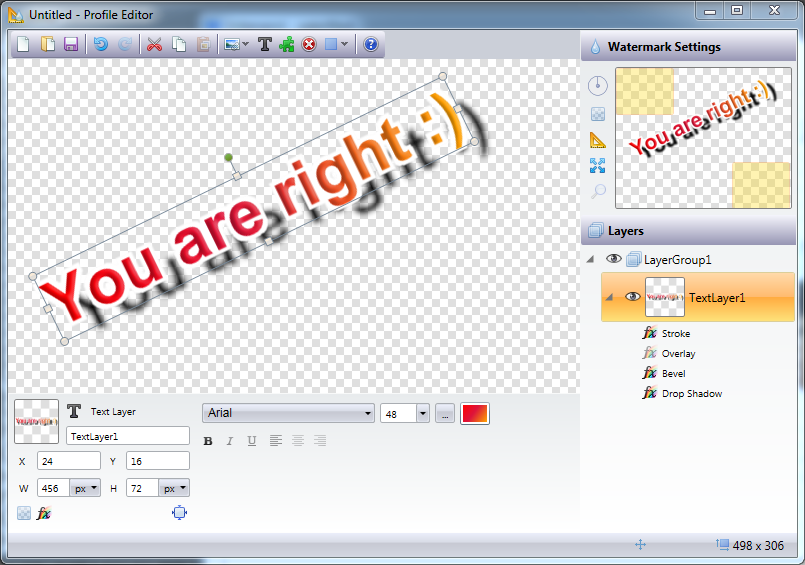
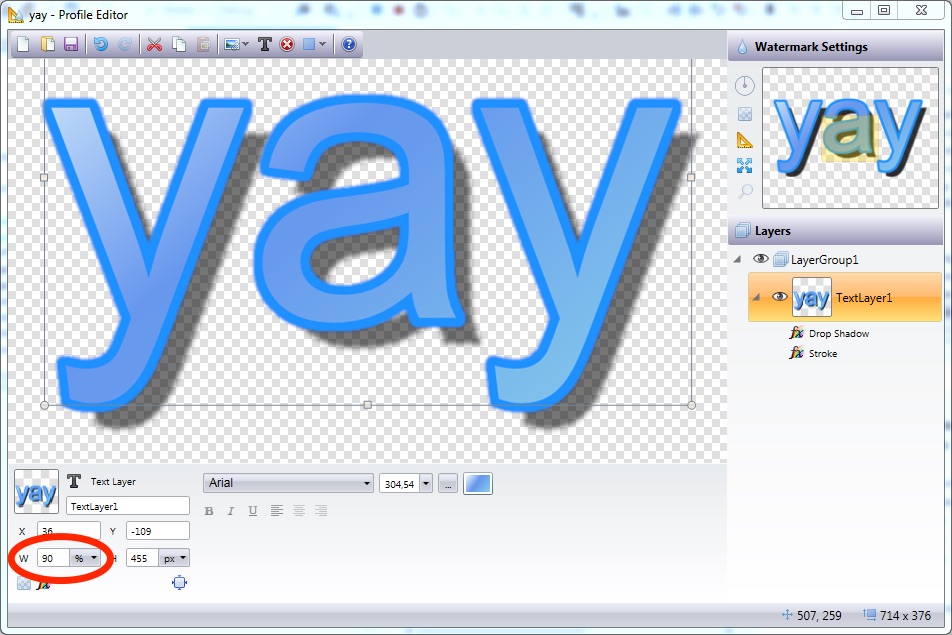
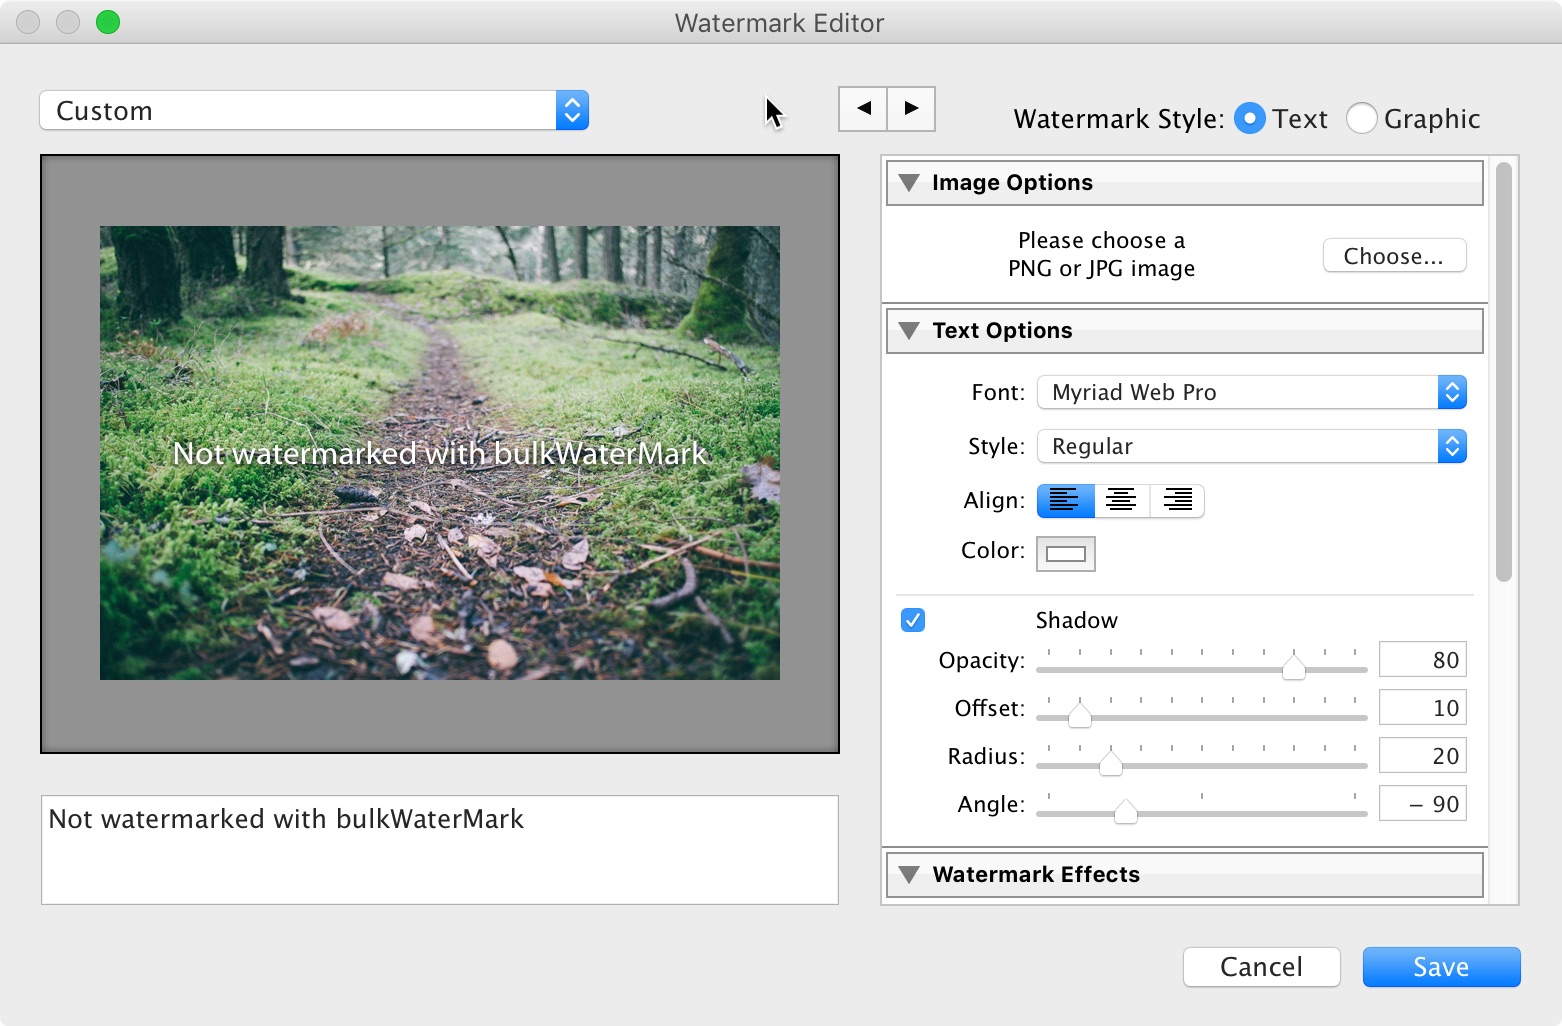
Now it’s getting interesting: Like the profile editor of bulkWaterMark, Lightroom opens a window called “Watermark Editor” that allows you to design your watermark.

Step 4: Exploring Lightroom's Watermark Editor
Step 4: Exploring Lightroom’s Watermark Editor

Lightroom’s Watermark Editor also has rudimental live editing features to change the size of your watermarks by dragging a text watermark’s edge, whereat bulkWaterMark features more detailed watermark composition possibilities comparable to the Adobe flagship product Photoshop.

The editor is split into multiple areas: Most of the dialog is filled with a preview canvas that displays one of your selected export pictures topped up with the watermark. The arrow buttons on the right top of the dialog let you browse through the photos to export and watermark.

Step 5: Mixed mode or pure graphic watermark?

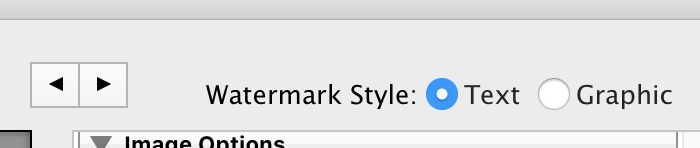
Next to the arrows you can set your watermark style with two radio buttons. Lightroom supports either a text watermark with an optional image watermark or a pure image watermark. If you select “Graphic” then you have to define an image file for watermarking. And if you choose “Text” then you can define an image file for watermarking. So the only thing these radio buttons are doing, is enabling or limiting some of the available watermark options.

Right below the style radio buttons you will find the settings of your custom watermark grouped in multiple sections. As mentioned above, depending on what style you are choosing, you can either edit all watermark options (selection “Text”) or just “Image Options” and “Watermark Effects” (selection “Graphic”).

Step 6a: Setting up a Graphic Watermark in Lightroom
Step 6b: More watermark options when going for "Text"
Step 6b: More watermark options when going for “Text”

For text watermarks you can additionally set font, color and the text itself of course and also render a nice drop shadow effect. Both watermark styles enable the Watermark Effects section: Watermark Effects can be defined for each watermark (also known as layer group). You can define the opacity, size, margin, angle and position of the watermark, so this section is the equivalent for bulkWaterMark’s Watermark Settings:

Watermark Settings in bulkWaterMark

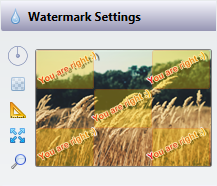
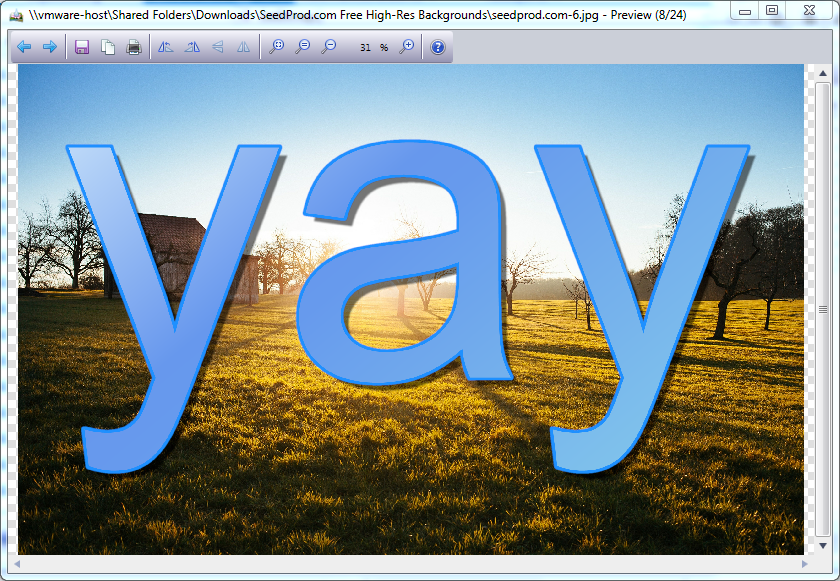
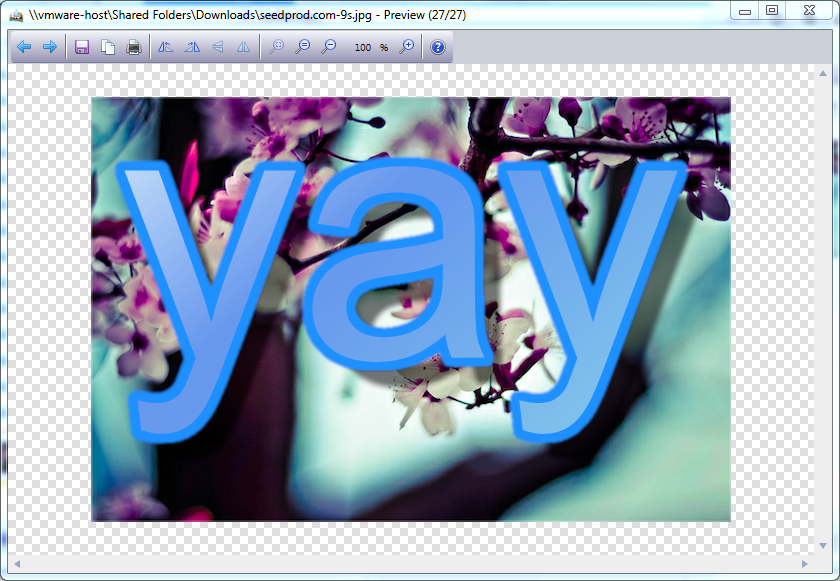
Lightroom allows you to scale a watermark proportional to the image size similar to the percentage layer size feature in bulkWaterMark and fit it into the picture by the defined inset. I prefer using the “Fit” option and setting the inset afterwards, because Lightroom displays helpful reference lines that illustrate the margin as depicted here:

Step 7: Setting the position and size of the watermark

You can also set an anchor for the watermark to position it, but you are limited to a single selection. Also a tile mode is missing that allows you to distribute your watermark over the complete photo.

Step 8: Ahoy! Setting an anchor!

If you are satisfied with your settings, you can close the dialog by clicking the Save button. Lightroom asks you for a preset name and after entering it you are back on the export dialog where the Export button awaits your final click to watermark photos.

Conclusion

So you have seen that watermarking in Lightroom works out pretty well. The configuration of the watermark is not always smooth, but on the whole very handy. It is integrated nicely in the export workflow of the application and also delivers good results. In comparison to our Photoshop tutorial the steps to create and setup our watermark are less complex and Lightroom is way faster in applying the watermarks on your pictures.

When comparing side by side with bulkWaterMark, Lightroom lacks of many key features that bulkWaterMark supports out of the box. Lightroom does not support variables within a text watermark to display Exif information for example. Also the positioning of the watermark is not as flexible as in bulkWaterMark where you can set multiple anchors and tile watermarks. In Lightroom you can use the drop shadow effect only on text watermarks, whereat bulkWaterMark allows you to use drop shadows on image or text watermarks and supports even more Photoshop-esque blending effects like glow, bevel, stroke or mirroring.

The big news at the end: We really like Lightroom as a professional app for organizing and editing photos, but we would love it even more if the watermark photos tool would support pro features too. Therefore we have a free Lightroom PlugIn in our roadmap for 2016 that lets you use bulkWaterMark within the Export workflow of Adobe Lightroom. 🙂

I hope my tutorial was helpful to you!

Cheers,

Phil

PS: Again for this tutorial: If you have another 2 and a half minutes, I would like you to invite you to watch how you can watermark photos even better with bulkWaterMark:

It's only fair to share...Share on facebook
Facebook
Share on google
Google
Share on twitter
Twitter
Share on linkedin
Linkedin

Old vs. New or PMlabs waterMark V2 vs. PMlabs bulkWaterMark

You are using PMlabs waterMark V2 already, so why should you switch to the brand new and commercial PMlabs bulkWaterMark?

bulkWaterMark App Icon

Since the release of waterMark V2, not only technology behind the software has changed, also my programming skills. waterMark V1 was first released in 2003, V2 followed 2005 and waterMark V3 aka bulkWaterMark has seen the light in late 2015. So what does bulkWaterMark batch watermarking photos better than its predecessors? Let’s take a look… 🙂

1. Better user experience for your daily image protection routine

We thought a lot about how to improve the user experience of waterMark V2. Like V1, the V2 had a similar interface for configuring the batch watermarking. Opening or defining the watermark and its position, setting an output format and folder, adding files to the batch run and finally hit the button to start watermarking your photos. Simple, but somehow not really self-explanatory.

Configuring a batch watermarking run with waterMark V2

I have often heard that people were overwhelmed when seeing waterMark V2 the first time in all its glory. For me as developer of the software, the workflow was clear, but for users not. Therefore, we redesigned the UI mechanics of bulkWaterMark for configuring the batch watermarking of photos.

bulkWaterMark Wizard Start View in Windows 10

bulkWaterMark welcomes you with a start view that lists all recently used watermarks. To use one of these watermarks to batch watermarking your photos, just double-click them. If you want to create a new watermark, double-click the first entry and the profile editor opens. By double-clicking the second entry of the list, you can open a watermark that is not in your list yet or has been saved on a different computer.

Dragging photos to protect from Explorer to bulkWaterMark

Afterwards the photo batch list view awaits your pictures to be dragged into the list. Just drag the image files or folders you would like to get watermarked from the Windows Explorer and drop them onto bulkWaterMark’s batch list. As soon as bulkWaterMark has some files to play with, you can check if the watermark looks good on the images without modifying the original files. Simply click a photo to get a preview. If everything is looking alright, then start the fast bulk watermarking by clicking the drop button. The app asks you politely where to save the protected files and tries to match the output file format with the input file type. Otherwise you can follow the wizard to change output settings like target folder, resizing, renaming and image format converting.

We know that this is probably the most significant UX change since waterMark V2 and also a few people have already told us that they are missing the old Explorer-style folder tree view and file list to browse within the application directly. Most users however, really like the drag and drop approach we are using here, since the user interface is more structured and less crowded now. The output settings are now optional for display, because once you have setup your profile, you will probably never ever need to change the output settings again. So your future workflow for watermarking pictures with bulkWaterMark is only consisting of three tasks anymore: Choose your profile, drag and drop your photos and click the drop! 🙂

2. Overhauled profile editor to design fresh and dynamic watermarks 

While waterMark V2 already allowed to create watermarks in WYSIWYG (What You See Is What You Get) style with layers like Photoshop, its profile editor had some limitations. Some examples: Layer rotation was not possible in V2 and if you wanted to add a new text watermark to your images, a new window appeared where you can edit the layer’s display text.

The old waterMark V2 profile editor

In bulkWaterMark you can now type directly your text layers and rotate or resize them via mouse. If you are accidentally deleting a layer, bulkWaterMark will fix that by offering you an undo of the fatal action. This and a lot of other features can now be controlled more smooth and natural as you would expect it from an image editing software. Tiny tweaks like previews of each available font (you can set for your text watermark when selecting the font family) are making the user experience perfect. Besides these UI improvements, there are also a ton of real new watermarking-relevant features that can be enabled within the new profile editor.

The brand new profile editor of bulkWaterMark

The bulkWaterMark screenshot above shows some of the new features: For example, you can see the new gradient color brush that is available for all layer color selections in your watermark. In the watermark above I used the colors red, crimson and gold to compose the gradient.

Also, the text layer of the watermark is rotated – a new feature for layers and layer groups in bulkWaterMark. Wait, layer groups? Yep, that’s also new. Layer groups are surprisingly a group of layers and stand for a watermark. So you now can apply multiple watermarks on a photo by defining multiple layer groups in bulkWaterMark’s watermark editor.

A text watermark with a gradient brush, a white stroke and light drop shadow

Another one: Blending effects. You can now have a soft drop shadow below your text or a thick stroke that surrounds each character. These effects can be combined and used for any type of layers, like image watermarks too.

Some blending effects applied on a text watermark
Some blending effect combinations applied on a text watermark

Also neat: Live preview your watermark while editing it. Just drag and drop an image file onto the preview of the profile editor and the picture gets previewed with the watermarks that are on your canvas.

Watermark preview with the new bulkWaterMark profile editor

Within the live preview, you can toggle the watermark position for each layer group and stamp a watermark multiple times in a picture in bulkWaterMark. And of course, we also added the often requested tile watermark mode to bulkWaterMark:

Finally! Tile watermarks in a PMlabs waterMark :)
Finally! Tile watermarks in a PMlabs waterMark 🙂

So you see: Upgrading to bulkWaterMark is already worth it! 😉 But wait for another few reasons… 🙂

3. Extendability!

bulkWaterMark is extendible by using PlugIns. In the next few month we will ship free PlugIns to provide more options for creating new watermarks, developing your own custom expressions for text watermarks or including new image formats for import and export. A social export PlugIn is also in the pipeline to support watermarked image upload for Facebook, Flickr and WordPress.

We will also release our PlugIn SDK as mentioned a few weeks ago. In the meantime we are fine tuning and optimizing all the interfaces and setting up the documentation.

4. New batch resizing and renaming options 

For bulkWaterMark we also did some fine tuning regarding resizing and renaming options. For resizing we added the possibility to set the resolution of the file in dpi and also implemented two flags to avoid enlarging smaller images or shrink bigger images. This is useful if you have a lot of high resolution photos in your batch list that need to be sized down to 800 x 600 pixels, mixed with some small pictures that are only at 640 x 600 for example. bulkWaterMark will watermark the small pictures too then, but will not resize them to 800 x 600 pixels, because the original size is smaller.

Resizing with more options in bulkWaterMark

Also renaming is now more clever than in waterMark V2: You can now dynamically build a renaming pattern in bulkWaterMark with properties from the input file like the original filename or output size:

Renaming output filenames with variables

In the screenshot above I am defining the renaming pattern “resized_$Wx$H_###”. When using typical photo taken by a digital camera or smartphone, the filename is probably something like “DSC_1232.jpg”. If this is the fifth image in your batch list and the image is 2500 x 1667 pixels, then this will result in the output filename “resized_2500x1667_005.jpg”.

5. Dynamic Expressions reloaded

bulkWaterMark brings also major improvements for users of expressions. Expressions can be used in text watermarks to display input or output image metadata. While waterMark V2 had just a simple find and replace mechanism to detect variables and replace them with metadata, bulkWaterMark parses and analyzes a text watermark’s content and offers completely new possibilities by parameterizing expressions, nesting their results or using logical conditions to control their output. And: Expressions can also be used in other watermark types. In image watermarks you can specify the image filename by using an expression. The following example shows how to use an image to illustrate that the watermarked picture was shot with flash:

Improved expressions with bulkWaterMark

When using the above expression and your input photo was shot with an Exif-capable camera, bulkWaterMark reads the Exif tag Flash first. If the value of the tag does not equal 0, the photo was shot by using a flash. In this case the expression returns the string “flash.png”. bulkWaterMark uses this resolved value as image watermark filename and stamps it into the photo, but only if the Exif tag is not 0:

Using expressions to render a conditional image watermark

Expression features are fully available in every version of bulkWaterMark, including PlugIn support. More in-depth details on the topic expressions will follow in the next few weeks in our blog!

6. Auto-scalable vectorized watermarks

Another important new feature of bulkWaterMark is auto-scaling watermarks according to the input image size. Sometimes you have different image sizes to watermark within a single batch run and want to display a watermark always in the center of the photo for example. With bulkWaterMark, this is no problem anymore:

Yay! A text watermark that is sized 90% of the canvas = 90% of the image to stamp

As you can see, bulkWaterMark always scales the text watermark that it measures 90 percent of the photo to watermark. This feature works best when centering watermarks horizontal. It guarantees high-res watermarks on high-res photos:

"Yay" applied on a high-res photo
“Yay” applied on a high-res photo

You also can apply it on normal photos. bulkWaterMark chooses the right font size according to the image size automatically:

The same vectorized text watermark on a smaller image

Conclusion

So you have seen that bulkWaterMark does indeed rock more than waterMark V2. It’s a lot more, also compared to paid alternatives. We hope you are enjoying the new features and tools that are packed with bulkWaterMark for protecting your photos with watermarks. Please keep in mind, that we still have a lot of ideas for future releases and PlugIns for 2016.

Stay tuned and watch out for a more detailed write-up about our new dynamic expressions in bulkWaterMark!

Happy holidays!

Phil

It's only fair to share...Share on facebook
Facebook
Share on google
Google
Share on twitter
Twitter
Share on linkedin
Linkedin

A Merry 25% Off bulkWaterMark Pro To You!

After unwrapping your Christmas presents, we would like to give you another small one from PMlabs’ Santa:

PMlabs Santa

During the holiday season, sharing in one of our most favorite things. Therefore we put bulkWaterMark for individuals on sale. By using the coupon code XMAS15, you will get 25% discount off bulkWaterMark Pro (valid until 31th of December). 🙂 (You need to enter the coupon code on check out after entering your customer details!)

We wish you a pleasant holiday season and all the best for 2016!

Cheers,

Phil

It's only fair to share...Share on facebook
Facebook
Share on google
Google
Share on twitter
Twitter
Share on linkedin
Linkedin

Tutorial: How to add watermarks to photos with Adobe Photoshop

There are many ways of adding watermarks to your images. So why should you use PMlabs bulkWaterMark or other similar batch photo tools instead of the free Gimp or the industry standard Photoshop? Even professional photo tools like Adobe Lightroom do watermarking, but in a very basic way compared to bulkWaterMark. The following series in our blog covers different approaches on how to watermark photos and shows you the pros and cons of several software solutions.

Our first test candidate is Adobe Photoshop. Photoshop is the world’s most popular and powerful image editor. Most users do not know about Photoshop’s batch capabilities, but its image operation features can be used for multiple files in a batch too. To get photos watermarked in a bulk operation, try out the following step-by-step guide. Note that our tutorial is done with Photoshop CC 2015 on a Mac, but shortcuts and user interface are nearly identical in Windows and the guide will also work for older versions.

Recording an Action to watermark photos

Photoshop has a nice feature called Actions. Most of you have probably used the Macro Recorder in Microsoft Office Products like Excel or Word to automate steps that you are doing often in your spreadsheets and documents. Actions are the counterpart of Macros in Photoshop to automate your image processing tasks. We will record now such an action to batch watermark photos.

For creating your Watermark Action in Photoshop (or profile as we call it in bulkWaterMark), I suggest to load one of the pictures you would like to watermark into Photoshop.

Step 1: Open an image you would like to watermark

Afterwards, click on the Actions button in the vertical toolbar on the right side of your Photoshop window. By default, this button is not displayed. To display the button, open the menu item Window and click the entry Actions.

Step 2: Open the Actions menu

In the Actions Window click the New Action button to create your new Watermark Action:

Step 3a: Create a brand new Action

Straight afterwards, define the name of the new Action and click Record:

Step 3b: Define a name and hit record

Now it’s getting exciting: Photoshop is from now on recording all your actions. But do not panic, you do not have to hurry. It’s time to get creative now and design your watermark. To keep it simple and stupid, I’m using the Horizontal Type Tool of Photoshop to insert a text watermark by clicking anywhere on the picture. The glorious text my watermark is displaying is “Not watermarked with bulkWaterMark”.

Step 4: Adding a text watermark

To make the looks of my text watermark more interesting, I’m using some of Photoshops layer blending effects, similar to the layer effects that bulkWaterMark features. You can access them by right clicking on the text watermark layer and select the menu item Blending Options.

Step 5: Topping up your watermark

I’m adding a stroke blending effect to make my watermark appear stronger. You can try out the various effects to find a style that suits best for your watermark. Photoshop also brings some default styles for layers that can be activated in the Styles tab (to enabled click the Styles entry in the Window menu).

Step 6: Select both layers to align the watermark

Now we need to align the watermark layer within the background layer. Therefore you need to select your watermark layer and the background layer by holding down the Control button on your keyboard (Mac: Command) and clicking the on both layers. This selection enables the Alignment buttons within the top tool bar. By using these buttons you can define how the watermark will be positioned on your photos:

Step 7: Aligning the watermark

And the final tweak for our watermark: Transparency. To change the alpha value of the text layer, just select the layer and set the value as you like.

Step 8: Setting the Opacity of the layer

Now you have recorded the creation and styling of the text layer as an Action. The last step that needs to be recorded is saving the image. Use the File menu and click its entry Save As to save the image under any name and file format like JPEG or PNG for example.

After saving the image, stop the recorder:

Step 9: Stopping the recorder


Starting the batch operation and applying the watermarks

It’s a wrap! Time to replay what we have recorded: Let’s batch watermark our photos! The File menu’s Automate/Batch menu entry leads us to a new dialog that lets you select an Action to replay for our batch job.

Step 10: Define your files and watermark 'em!
Step 10: Define your files and watermark ’em!

In the Play section of the dialog, Photoshop automatically selects our new Watermark Action. In the Source section, select Folder as batch source and choose the folder where your images you like to watermark are located.

Next is the Destination section: Define your destination folder where to save the watermarked pictures. Tick the check box that says “Override Action Save As Commands” also. This overrides the filename you have chosen when recording the Action and makes use of the following settings:

In the File Naming section you can define the naming of the output files. By default, Photoshop uses the original input image’s name and the extension of your output format.

When you are fine with your batch configuration click ok and lean back… 😉


Conclusion

We cannot deny that Photoshop is a kind of a blueprint for some features of bulkWaterMark. Photoshop is powerful and can be used for anything concerning image processing. But what does bulkWaterMark better?

When trying out the Photoshop Action, you will realize that running batch operations with Photoshop is not that fast. If you are working with thousands of photos, bulkWaterMark will protect your images much faster than Photoshop, since Photoshop replays the individual steps of an Action for every single picture. You will see every recorded step over and over again for each image. All layers and effects get recreated and re-rendered, while bulkWaterMark does this initially or only when it is necessary.

Also, bulkWaterMark supports auto-scaling of watermarks that are too big for your photos. Furthermore, it automatically adjusts the size of a watermark proportionally, so that you can use a text layer as watermark that is 10 percent of the input photo’s width for example.

While Photoshop can do any image processing purposes in general, bulkWaterMark brings a lot of features that are really important to batch watermark photos that Photoshop does not offer. bulkWaterMark’s expressions are a unique and functional addition that allow scriptable content for text layers like displaying Exif metadata for example. Also the batch image resizing and renaming features are more versatile and tailor-made for batch watermarking.

bulkWaterMark is simply designed for doing fast, complex and stunning batch operations with your pictures. Its philosophy is streamlined and the wizard-driven workflow is less complex and more focused on protecting your images with watermarks. Once you created a watermark profile of your needs, you can just drag the photos into bulkWaterMark, drop them and forget about the rest. But don’t forget to pick up the protected photos in your destination folder… 😉

Hope you liked my tutorial!

Cheers,

Phil

PS: If you have another 2 and a half minutes, I would like you to invite you to watch our video tutorial on how you can do the above job with bulkWaterMark:

It's only fair to share...Share on facebook
Facebook
Share on google
Google
Share on twitter
Twitter
Share on linkedin
Linkedin

Can you extend your watermark with PlugIns?

Although bulkWaterMark is a fresh app for batch watermarking your photos, we have already gotten a dozen of requests how you can code PlugIns for it, since it has a tab called “PlugIns” in its settings dialog.

The good news: Yes, there will be full PlugIn support for new layer types, expressions or input image format readers and output image format writers. Just like in Photoshop, that also supports a lot of modding and extension interfaces. In the future we will also offer the possibility to create custom blending effects too. We hope that the PlugIn SDK will we be a success and will attract developers.

And the bad: Currently we do not have any documentation for our PMlabs GrfX PlugIn interface. The software development kit is not ready yet and will probably modified in the next few releases.

Although we have not officially announced the PlugIn SDK yet and bulkWaterMark is already out, a dear user barnacleboy already made an expressions PlugIn and posted a template with instructions on Github. Thanks for that! 🙂

It's only fair to share...Share on facebook
Facebook
Share on google
Google
Share on twitter
Twitter
Share on linkedin
Linkedin

Tutorial: Tile watermarking photos in waterMark V2 vs. bulkWaterMark

When I have seen the PMlabs waterMark V2 tutorial video by Kory Sutherland for the first time, I was really proud that someone has made a short video about my software. I never came up with a video by myself, so I am really thankful that Kory took over the duty and showed more than 25,000 users on YouTube how to use waterMark V2. The video demonstrates the basic workflow of the application and shows how to watermark your photos with tile watermarks, a feature that is actually missing and was often requested by waterMark V2 users.

When we got bulkWaterMark ready for release, I thought we must  do a similar video to Kory’s waterMark V2 tutorial since I was literally blown away when I’ve first seen it. When I released V2, I never thought of a video tutorial, I would rather have done a write-up of all steps for getting  pictures protected.

For bulkWaterMark we implemented a tile mode as a whole new option for stamping watermarks on your images. In the new version of the watermarking software, you just need to switch to the tile mode to achieve the same result as Kory, but you are done in a second and have a perfect tile watermark for any image size:

The video also demonstrates our new blending effects for watermark layers of any type. The watermark in the video consists of the drop image and a text layer that displays “drop”. While the text layer features linear gradient colors and the stroke effect, both layers make use of the fading mirror effect.

We hope you like the new features of bulkWaterMark we are show casing in the tutorial video. Stay tuned for more – I think the expressions feature should get a tutorial too… 🙂

Get details on bulkWaterMark and the best practices how to batch watermark your photos.


It's only fair to share...Share on facebook
Facebook
Share on google
Google
Share on twitter
Twitter
Share on linkedin
Linkedin

Welcome to my (our) new blog!

You might have noticed that my old website pmnet.info has been closed since a month now. And that you will get redirected to a new website called pmlabs-apps.com. This is because of the release of bulkWaterMark – the successor of the app you visited pmnet.info for: waterMark V2.

So the new waterMark V3 is a commercial software now. But why are you selling the new version? PMlabs waterMark V1 and V2 were one of the few freeware solutions to solve the photo protection problem that really worked without a shareware trap. Especially V2 was a success for me since the app was downloaded 200,000 times on my private website alone without counting the downloads on other websites and download directories. It was distributed as donationware to run the website, keep me motivated for bugfixes or new features and – of course – make some beer money. But: Donationware did not work – at least not for me.

So, I took it serious with the new version and released it as a freemium software. The software is now much more professional, functional and robust. It is built on a modular framework, allows extension via plug-ins and has an improved user experience. It is simply the best PMlabs waterMark ever released. But it’s not completely free anymore.

The deal is simple: If you want a better, improved waterMark V2 with a smoother and more modern user interface for free, you can decide for a freeware version that comes with a nag screen before stamping your photos with watermarks. bulkWaterMark Free is clearly better than V2, has the new image processing core and comes with full expression support.

If you want to show love for our work – our, because I’m not the only one working on it anymore – you can grab bulkWaterMark Basic for $ 9. It removes the nag and is the right choice for individuals that just need the basic feature set.

The full package with all the new fancy stuff like Photoshop-esque blending effects, tile watermarks, layer groups and proportional layer resizing comes with the Pro and Business editions priced at $ 29 and $ 39, whereat they have both the same features, but the Pro version is targeted for individual photographs and the Business edition for companies.

Finally, I hope you like the latest version of our waterMark. If you are interested in buying a Basic, Pro or Business license of bulkWaterMark, here a coupon to get a -15% discount off the app: PMNETBLOG. Enter the coupon code when checking out, it is valid until the end of January 2016.

And: PMlabs bulkWaterMark 1.0 is just the first step. We have a lot more ideas for the future. There will be a free PlugIn software development kit for bulkWaterMark in early 2016. This blog for example will feature tutorials and articles to showcase what bulkWaterMark can do your you.

Thank you for reading!

Stay tuned and protect your photos with watermarks the clever way!

Cheers,

Phil

It's only fair to share...Share on facebook
Facebook
Share on google
Google
Share on twitter
Twitter
Share on linkedin
Linkedin