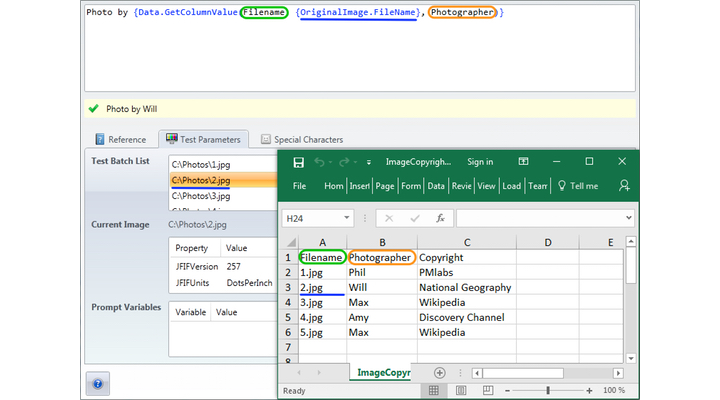
Many of you asked for a simple tutorial on using Excel data as source for dynamic text watermarks. Here you go:
HTH
Phil
Many of you asked for a simple tutorial on using Excel data as source for dynamic text watermarks. Here you go:
HTH
Phil
I guess that’s familiar to you: You have finished a shooting, edited your pictures with Lightroom and before publishing the samples in the internet, you are going to resize and rename the photos and watermark them. You hopefully use bulkWaterMark therefore, because putting your photos into the app to add text to pictures in batch is a no-brainer without any effort. This is probably the most typical use case of bulkWaterMark.
But bulkWaterMark can do a lot more for you than just inserting the same static text in every picture again and again. Of course, you probably have already seen our tutorials on the blog about inserting dynamic text in photos. Until now we have just given you hints for using image metadata in watermarks. Today I would like to show you how to get completely external data depending on the photo you are going to watermark into your protected pictures. But what do I mean with external data? I’m thinking of an Excel Workbook as data source, similar to the serial letter feature of Microsoft Word that takes names and addresses from an Excel spreadsheet.
You all know the serial letter feature of Word. Dynamic We are just doing the same in bulkWaterMark – instead of inserting the dynamic data into a letter, we are putting the data directly into a photo you are going to watermark.
But Excel is a spreadsheet program!? Why should I use a Microsoft Office app for putting data into watermarks?
It simple: By using bulkWaterMark Data Expressions, you can read from Excel Workbooks, search for a particular row and return any cell data of that found row that can be used as text for your watermark. Because most people like and understand Excel, we thought that it is a nice idea to use Excel as primary data source for so-called text data watermarks. As an alternative, you can also use CSV files if you want a more open source data format.
Many of our customers are already using this features. The most typical use case for is explained in our sample below, but I would like to give so some really creative examples of use, that we would not have thought of when developing the features.
Cardealers are using Data Expressions for creating photos for used car exchange websites. Pictures of offered cars are getting watermarked not only with the car dealer’s logo, but also with specific car data like its price or mileage.
Another customer has implemented a watermark template that generates a personal deck of Happy Family cards out of a bunch of images. This was achieved by using the image border layer of bulkWaterMark. The bottom of the border contains the occupation types that are fetched from an Excel spreadsheet.
Assume that we have thousands of pictures and a likewise long list of data that includes annotations for each photo. In our tutorial sample I have a list of filenames that contains the name of the photographer and the copyright holder of each photo. This is how it looks like:
The first column contains the name of each file we want to watermark, called “Filename”. We need this column to identify which image belongs to each row of data. The next column are the data columns and contain the name of the photographer (“Photographer”) and the name of the copyright owner (“Copyright”).
Our database and structure is defined – time to launch bulkWaterMark and create a new watermark template in the Profile Editor. First we are adding a new text layer and switch to the Expression Editor:
Now it’s getting interesting: We have to choose our data source now, which is the previously introduced Excel worksheet. Therefore, click onto the gear icon next to the Data Expression Context to configure the data source.
After defining a file (you can either use an Excel or CSV file), bulkWaterMark loads a raw preview of the data and displays the available sheets (Excel only) and columns within the data file. Our sample Excel file consists of a single sheet called “ImageCopyrights” that includes the previously shown data the we want to stamp onto our pictures. Afterwards I’m confirming my data source settings and we are nearly finished with our tutorial.
The only thing missing is the Expression that defines how the text of the watermark is getting composed. Therefore we are typing the following Expression into the Editor:
1 |
Photo by {Data.GetColumnValue(Filename, {OriginalImage.FileName}, Photographer)} |
As keen bulkWaterMark tutorial (and online help!) reader you likely know what this text above means. But for the sake of completeness I would like to explain what those brackets and cryptic names are for:
The text till “Photo by ” is not an Expression – this will be written into the watermark directly. The interesting part starts when the first bracket “{” sets in and the magic begins: The function “GetColumnValue” of the “Data” context gets called. This function requires to parameters:
The first parameter (green) expects the name of the column that contains the image filename. This column gets searched for the the filename and is column A called “Filename” in our Excel file.
The second parameter (blue) is the value, that we are searching within column “Filename”. We are putting another, nested Expression result as parameter: {OriginalImage.FileName} returns the filename of the current image we are going to watermark.
Parameter #3 (orange) defines the column we want to actually use in our text watermark. The data for the text watermark should be taken from column C “Photographer”.
This is how it looks like in bulkWaterMark:
And this is how a watermarked photo looks like:
In our new Expression Editor you can also set test parameters for testing dynamic expressions easily by switching to the tab “Test Parameter” and adding a few image files. You can now select any of the added test images by a single click and depending on the selection, bulkWaterMark sets the property {OriginalImage.FileName} to the chosen image filename.
The new Expression Editor and Data Expression feature improve the handling of dynamic text watermarks a lot. Data Expressions might look complicated on the first sight, but after a few tries you will quickly batch watermark thousands of photos with external and individual data in no time. I think the effort already pays off when you want to watermark a few dozens of images with dynamic data.
If you need help with integrating your Excel or CSV data in your watermark profile do not hesitate to contact our support or just post above this article. Our presented example is included in our samples library that comes with a fresh bulkWaterMark installation.
Update 2018-11-05: Check out this video for another simple Excel watermark tutorial:
Cheers,
Phil
bulkWaterMark turns 1 today and we have just released a new version of bulkWaterMark with huge features! The first one I would like to introduce with this blog post is a powerful addition to the border images feature: Placeholders!
Our August 2016 release introduced the Frame Layer to border photos fast with bulkWaterMark. The new Placeholders are an essential upgrade for the Frame Layer.
So what are Placeholders good for? Layers in bulkWaterMark can provide Placeholders that can be used to host Child Layers. Let’s say you want to add an image description and design a picture frame that looks like a Polaroid instant photo with handwritten text on it:
First you need to insert a new Frame Layer into your watermark template. I’m using the gradient brush tool to create a texture that makes the frame look like a sepia colored instant photo.
Now I’m increasing the thickness of the bottom border. I set it to 150 pixels to make it look like a typical instant photo. After resizing the bottom border, bulkWaterMark indicates that this part of Frame Layer can be used as a Placeholder for hosting another Layer:
The Placeholder is now ready to be filled with text. Click the “Add Text Layer” button and afterwards hit the light grey Placeholder area to insert the Text Layer into the Placeholder.
This new Text Layer is now dependent on its parent Layer in terms of position, size and visibility. If you disable the visibility of the Frame Layer, the Text Layer is also hidden. If a batch image resizes your Frame Layer, the description Text Layer gets resized and repositioned to. If you delete the Frame Layer, you delete the Text Layer. And so on…
I’m making a few adjustments to fit any text nicely into the Placeholder by setting the Font Size to Auto Size. Additionally, I’m aligning the content to the center of the Text Layer. Now you can use any input picture for watermarking and the Frame Layer positions the border around the image including the description Text Layer perfectly. Finally, I’m adding a soft drop shadow effect to the Frame Layer and rotating the whole watermark for a few degrees.
After saving the Profile, I’m in the Batch View to select a bunch of image files that should get decorated with a border.
Because I’m using the drop shadow effect, bulkWaterMark will generate a semi-transparent output picture. I would recommend to set an output image format like PNG, GIF or WebP to keep the semi-transparency for output files. (A feature that solves this problem is on the way!)
After clicking the Drop button, you can lean back and bulkWaterMark borders the selected images.
The Placeholder feature is available from bulkWaterMark Pro and can be tried out in our 30 days trial version.
In the next tutorial I will demonstrate how to replace our static “DESCRIPTION” text with dynamic data from a Microsoft Excel Workbook.
Thank you for your attention!
Cheers,
Phil
Long time, no see! In the last few weeks we were busy finishing the new features for our latest major bulkWaterMark release. Version 1.0.1543.131, available now, brings two new features for our batch photo watermark app:
bulkWaterMark has a brand new Expression Context to retrieve geographical data about the current photo. Trust me, you will love this feature to illustrate your holiday trip by displaying the place or address where you have taken the picture as watermark.
To use this feature your image needs to come with GPS coordinates saved in its Exif metadata. When you are taking a picture with your phone, nearly all modern smartphones are saving the coordinates of the current place within the image. Furthermore, you need access to the internet as bulkWaterMark will lookup the place that is specified by the coordinates in OpenStreetMap.
But how does this work? Learn how to watermark photos with geo data in bulkWaterMark by using Dynamic Expressions.
Let’s start from the scratch. When opening bulkWaterMark, we double click “New Watermark Profile” to create a new watermark and open the Profile Editor.
Now I’m going to add a new text watermark by clicking the Text Layer button:
It’s up to you now to bring some style into your watermark. I have played around with gradient colors, drop shadow and a soft bevel effect and came up with this:
Now it’s getting interesting: Select the Text Layer by simply clicking on it. A popup button will appear now like in the picture above. Click on bubble icon and it will open the Expressions Editor for the selected Text Layer.
Above you will see the Expression Editor for a text watermark without a dynamic expression. Highlighted you can see the text you have entered before when adding the Text Layer to your Watermark Profile. I went with the standard text “TextLayer1”.
To bring in a Dynamic Expression with GIS (Geographic Information System) data, I’m selecting all the text in the Text section of the dialog. Afterwards I’m browsing through the Expression Reference, more precisely I’m selecting the Geo Expression Context and double click the City Expression. Double clicking the Expression results in a replacing of the highlighted “TextLayer1” text:
This means, that the Text Layer has now a fully dynamic text, that relies on the Geo.City Expression. You can additionally add some static text by changing the text to “Current City: {Geo.City}”. If you are happy with your Expression, you can apply the changes to the Text Watermark by clicking the button with the green tick.
It’s time to try out the Expression. You can do this directly within the Profile Editor by dragging and dropping an image file with Exif GPS data onto the Watermark Settings Preview:
After saving the Profile, you can start to batch watermark your pictures as usual. Just make sure that you have turned on your internet connection, otherwise you will get an error message.
Geo Expressions are available for all users with Basic versions and above.
Sometimes you want to watermark photos randomly to make sure that no automated watermark remover or photo crop batch action can remove a watermark from photos easily. bulkWaterMark has a new feature called Random Watermarks to solve this issue.
To activate Random Watermarks you just need to switch to Random mode in the Watermark Settings (see the highlighted button above). Afterwards you can select all the corners where the watermark potentially could appear. bulkWaterMark chooses a random corner for each image then from the corners and positions you have defined previously.
Random Watermarks can be used by users with Pro or Business licenses.
Hope you like our new features!
We are happy about any feedback! 🙂
Cheers,
Phil
Hi folks!
With the new release 1.0.1482.121 of our batch watermark software, we are delivering a bunch of fresh design ideas for your text watermarks. We have included our well known “drop” sample from the watermark photos tutorial video and many text watermarks with advanced layer styling.
I hope that these templates can be useful for crafting your own special watermarks for protecting your photos:
Furthermore, the new version fixes also problems with computers without Microsoft .NET Framework 4.0 by downloading and installing the framework automatically if it can not be found.
Get the new version here to start watermarking photos.
We wish you a pleasant weekend!
Cheers
Phil
Since Apple dismissed it’s fabulous photo software Aperture, I started to look into Adobe’s alternative: Lightroom. I really like the photo editing capabilities and features of Lightroom a lot and I’m an avid fan of the software. Compared to our Photoshop watermarking tutorial a few weeks ago, Lightroom has a “real” built-in feature to watermark photos. In this article I would like to look into the photo watermarking functions of Lightroom and how they perform in contrast to bulkWaterMark or waterMark V2.
First of all, Lightroom does a very basic batch watermarking job compared to bulkWaterMark, but the integration in your photo editing workflow is a big plus here. As in bulkWaterMark or waterMark V2, Lightroom does also allow image and text watermarks for protecting your pictures. I’m using the latest version Adobe Lightroom CC 2015 in this tutorial on a Mac, but as usual: This should also work for older versions, since to watermark photos is not a new feature anymore. Also: Windows shortcuts and menu titles are the same as on the Mac, unless stated otherwise.
In Lightroom, you can watermark photos when exporting your photos. Therefore, I suggest selecting a few images in our library that we want to export and clicking the “File/Export…” menu entry.
Afterwards, the export dialog pops up and displays several options for configuring your image output. Please choose your basic export settings like destination folder and output format as you need them – these settings are similar to bulkWaterMark’s watermark output settings. When you scroll down to the bottom, you will find a settings group called Watermarking. Open up the group, tick the check box “Watermark” and click the combo box to select the entry “Edit watermarks…”:
Now it’s getting interesting: Like the profile editor of bulkWaterMark, Lightroom opens a window called “Watermark Editor” that allows you to design your watermark.
Lightroom’s Watermark Editor also has rudimental live editing features to change the size of your watermarks by dragging a text watermark’s edge, whereat bulkWaterMark features more detailed watermark composition possibilities comparable to the Adobe flagship product Photoshop.
The editor is split into multiple areas: Most of the dialog is filled with a preview canvas that displays one of your selected export pictures topped up with the watermark. The arrow buttons on the right top of the dialog let you browse through the photos to export and watermark.
Next to the arrows you can set your watermark style with two radio buttons. Lightroom supports either a text watermark with an optional image watermark or a pure image watermark. If you select “Graphic” then you have to define an image file for watermarking. And if you choose “Text” then you can define an image file for watermarking. So the only thing these radio buttons are doing, is enabling or limiting some of the available watermark options.
Right below the style radio buttons you will find the settings of your custom watermark grouped in multiple sections. As mentioned above, depending on what style you are choosing, you can either edit all watermark options (selection “Text”) or just “Image Options” and “Watermark Effects” (selection “Graphic”).
For text watermarks you can additionally set font, color and the text itself of course and also render a nice drop shadow effect. Both watermark styles enable the Watermark Effects section: Watermark Effects can be defined for each watermark (also known as layer group). You can define the opacity, size, margin, angle and position of the watermark, so this section is the equivalent for bulkWaterMark’s Watermark Settings:
Lightroom allows you to scale a watermark proportional to the image size similar to the percentage layer size feature in bulkWaterMark and fit it into the picture by the defined inset. I prefer using the “Fit” option and setting the inset afterwards, because Lightroom displays helpful reference lines that illustrate the margin as depicted here:
You can also set an anchor for the watermark to position it, but you are limited to a single selection. Also a tile mode is missing that allows you to distribute your watermark over the complete photo.
If you are satisfied with your settings, you can close the dialog by clicking the Save button. Lightroom asks you for a preset name and after entering it you are back on the export dialog where the Export button awaits your final click to watermark photos.
So you have seen that watermarking in Lightroom works out pretty well. The configuration of the watermark is not always smooth, but on the whole very handy. It is integrated nicely in the export workflow of the application and also delivers good results. In comparison to our Photoshop tutorial the steps to create and setup our watermark are less complex and Lightroom is way faster in applying the watermarks on your pictures.
When comparing side by side with bulkWaterMark, Lightroom lacks of many key features that bulkWaterMark supports out of the box. Lightroom does not support variables within a text watermark to display Exif information for example. Also the positioning of the watermark is not as flexible as in bulkWaterMark where you can set multiple anchors and tile watermarks. In Lightroom you can use the drop shadow effect only on text watermarks, whereat bulkWaterMark allows you to use drop shadows on image or text watermarks and supports even more Photoshop-esque blending effects like glow, bevel, stroke or mirroring.
The big news at the end: We really like Lightroom as a professional app for organizing and editing photos, but we would love it even more if the watermark photos tool would support pro features too. Therefore we have a free Lightroom PlugIn in our roadmap for 2016 that lets you use bulkWaterMark within the Export workflow of Adobe Lightroom. 🙂
I hope my tutorial was helpful to you!
Cheers,
Phil
PS: Again for this tutorial: If you have another 2 and a half minutes, I would like you to invite you to watch how you can watermark photos even better with bulkWaterMark:
You are using PMlabs waterMark V2 already, so why should you switch to the brand new and commercial PMlabs bulkWaterMark?
Since the release of waterMark V2, not only technology behind the software has changed, also my programming skills. waterMark V1 was first released in 2003, V2 followed 2005 and waterMark V3 aka bulkWaterMark has seen the light in late 2015. So what does bulkWaterMark batch watermarking photos better than its predecessors? Let’s take a look… 🙂
We thought a lot about how to improve the user experience of waterMark V2. Like V1, the V2 had a similar interface for configuring the batch watermarking. Opening or defining the watermark and its position, setting an output format and folder, adding files to the batch run and finally hit the button to start watermarking your photos. Simple, but somehow not really self-explanatory.
I have often heard that people were overwhelmed when seeing waterMark V2 the first time in all its glory. For me as developer of the software, the workflow was clear, but for users not. Therefore, we redesigned the UI mechanics of bulkWaterMark for configuring the batch watermarking of photos.
bulkWaterMark welcomes you with a start view that lists all recently used watermarks. To use one of these watermarks to batch watermarking your photos, just double-click them. If you want to create a new watermark, double-click the first entry and the profile editor opens. By double-clicking the second entry of the list, you can open a watermark that is not in your list yet or has been saved on a different computer.
Afterwards the photo batch list view awaits your pictures to be dragged into the list. Just drag the image files or folders you would like to get watermarked from the Windows Explorer and drop them onto bulkWaterMark’s batch list. As soon as bulkWaterMark has some files to play with, you can check if the watermark looks good on the images without modifying the original files. Simply click a photo to get a preview. If everything is looking alright, then start the fast bulk watermarking by clicking the drop button. The app asks you politely where to save the protected files and tries to match the output file format with the input file type. Otherwise you can follow the wizard to change output settings like target folder, resizing, renaming and image format converting.
We know that this is probably the most significant UX change since waterMark V2 and also a few people have already told us that they are missing the old Explorer-style folder tree view and file list to browse within the application directly. Most users however, really like the drag and drop approach we are using here, since the user interface is more structured and less crowded now. The output settings are now optional for display, because once you have setup your profile, you will probably never ever need to change the output settings again. So your future workflow for watermarking pictures with bulkWaterMark is only consisting of three tasks anymore: Choose your profile, drag and drop your photos and click the drop! 🙂
While waterMark V2 already allowed to create watermarks in WYSIWYG (What You See Is What You Get) style with layers like Photoshop, its profile editor had some limitations. Some examples: Layer rotation was not possible in V2 and if you wanted to add a new text watermark to your images, a new window appeared where you can edit the layer’s display text.
In bulkWaterMark you can now type directly your text layers and rotate or resize them via mouse. If you are accidentally deleting a layer, bulkWaterMark will fix that by offering you an undo of the fatal action. This and a lot of other features can now be controlled more smooth and natural as you would expect it from an image editing software. Tiny tweaks like previews of each available font (you can set for your text watermark when selecting the font family) are making the user experience perfect. Besides these UI improvements, there are also a ton of real new watermarking-relevant features that can be enabled within the new profile editor.
The bulkWaterMark screenshot above shows some of the new features: For example, you can see the new gradient color brush that is available for all layer color selections in your watermark. In the watermark above I used the colors red, crimson and gold to compose the gradient.
Also, the text layer of the watermark is rotated – a new feature for layers and layer groups in bulkWaterMark. Wait, layer groups? Yep, that’s also new. Layer groups are surprisingly a group of layers and stand for a watermark. So you now can apply multiple watermarks on a photo by defining multiple layer groups in bulkWaterMark’s watermark editor.
Another one: Blending effects. You can now have a soft drop shadow below your text or a thick stroke that surrounds each character. These effects can be combined and used for any type of layers, like image watermarks too.
Also neat: Live preview your watermark while editing it. Just drag and drop an image file onto the preview of the profile editor and the picture gets previewed with the watermarks that are on your canvas.
Within the live preview, you can toggle the watermark position for each layer group and stamp a watermark multiple times in a picture in bulkWaterMark. And of course, we also added the often requested tile watermark mode to bulkWaterMark:
So you see: Upgrading to bulkWaterMark is already worth it! 😉 But wait for another few reasons… 🙂
bulkWaterMark is extendible by using PlugIns. In the next few month we will ship free PlugIns to provide more options for creating new watermarks, developing your own custom expressions for text watermarks or including new image formats for import and export. A social export PlugIn is also in the pipeline to support watermarked image upload for Facebook, Flickr and WordPress.
We will also release our PlugIn SDK as mentioned a few weeks ago. In the meantime we are fine tuning and optimizing all the interfaces and setting up the documentation.
For bulkWaterMark we also did some fine tuning regarding resizing and renaming options. For resizing we added the possibility to set the resolution of the file in dpi and also implemented two flags to avoid enlarging smaller images or shrink bigger images. This is useful if you have a lot of high resolution photos in your batch list that need to be sized down to 800 x 600 pixels, mixed with some small pictures that are only at 640 x 600 for example. bulkWaterMark will watermark the small pictures too then, but will not resize them to 800 x 600 pixels, because the original size is smaller.
Also renaming is now more clever than in waterMark V2: You can now dynamically build a renaming pattern in bulkWaterMark with properties from the input file like the original filename or output size:
In the screenshot above I am defining the renaming pattern “resized_$Wx$H_###”. When using typical photo taken by a digital camera or smartphone, the filename is probably something like “DSC_1232.jpg”. If this is the fifth image in your batch list and the image is 2500 x 1667 pixels, then this will result in the output filename “resized_2500x1667_005.jpg”.
bulkWaterMark brings also major improvements for users of expressions. Expressions can be used in text watermarks to display input or output image metadata. While waterMark V2 had just a simple find and replace mechanism to detect variables and replace them with metadata, bulkWaterMark parses and analyzes a text watermark’s content and offers completely new possibilities by parameterizing expressions, nesting their results or using logical conditions to control their output. And: Expressions can also be used in other watermark types. In image watermarks you can specify the image filename by using an expression. The following example shows how to use an image to illustrate that the watermarked picture was shot with flash:
When using the above expression and your input photo was shot with an Exif-capable camera, bulkWaterMark reads the Exif tag Flash first. If the value of the tag does not equal 0, the photo was shot by using a flash. In this case the expression returns the string “flash.png”. bulkWaterMark uses this resolved value as image watermark filename and stamps it into the photo, but only if the Exif tag is not 0:
Expression features are fully available in every version of bulkWaterMark, including PlugIn support. More in-depth details on the topic expressions will follow in the next few weeks in our blog!
Another important new feature of bulkWaterMark is auto-scaling watermarks according to the input image size. Sometimes you have different image sizes to watermark within a single batch run and want to display a watermark always in the center of the photo for example. With bulkWaterMark, this is no problem anymore:
As you can see, bulkWaterMark always scales the text watermark that it measures 90 percent of the photo to watermark. This feature works best when centering watermarks horizontal. It guarantees high-res watermarks on high-res photos:
You also can apply it on normal photos. bulkWaterMark chooses the right font size according to the image size automatically:
So you have seen that bulkWaterMark does indeed rock more than waterMark V2. It’s a lot more, also compared to paid alternatives. We hope you are enjoying the new features and tools that are packed with bulkWaterMark for protecting your photos with watermarks. Please keep in mind, that we still have a lot of ideas for future releases and PlugIns for 2016.
Stay tuned and watch out for a more detailed write-up about our new dynamic expressions in bulkWaterMark!
Happy holidays!
Phil
When I have seen the PMlabs waterMark V2 tutorial video by Kory Sutherland for the first time, I was really proud that someone has made a short video about my software. I never came up with a video by myself, so I am really thankful that Kory took over the duty and showed more than 25,000 users on YouTube how to use waterMark V2. The video demonstrates the basic workflow of the application and shows how to watermark your photos with tile watermarks, a feature that is actually missing and was often requested by waterMark V2 users.
When we got bulkWaterMark ready for release, I thought we must do a similar video to Kory’s waterMark V2 tutorial since I was literally blown away when I’ve first seen it. When I released V2, I never thought of a video tutorial, I would rather have done a write-up of all steps for getting pictures protected.
For bulkWaterMark we implemented a tile mode as a whole new option for stamping watermarks on your images. In the new version of the watermarking software, you just need to switch to the tile mode to achieve the same result as Kory, but you are done in a second and have a perfect tile watermark for any image size:
The video also demonstrates our new blending effects for watermark layers of any type. The watermark in the video consists of the drop image and a text layer that displays “drop”. While the text layer features linear gradient colors and the stroke effect, both layers make use of the fading mirror effect.
We hope you like the new features of bulkWaterMark we are show casing in the tutorial video. Stay tuned for more – I think the expressions feature should get a tutorial too… 🙂
Get details on bulkWaterMark and the best practices how to batch watermark your photos.